Configuring Looker for Performance and Scalability

As businesses seek to rapidly scale their BI, capabilities, they may find that their Looker instance is becoming disorganised and difficult to use. It won’t be long before they face performance issues while getting lost when trying to navigate their instances. Here are five areas of focus to quickly improve your Looker instance, to improve performance and scalability.
1. Structure your project folders
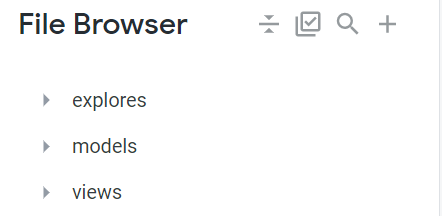
Organisation within Looker is key. An organised Looker instance will provide more value to your business. Therefore, we recommend you have individual folders for each LookML object. For example, keep all view files in a “views” folder, explore files in an “explores” folder, model files in a “models” folder, and likewise:

2. Follow standardised naming conventions
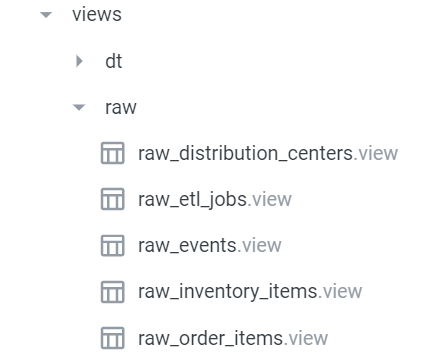
Regardless of the LookML object, be consistent with your naming strategies. For instance, adding prefixes to your raw file is a great idea. Additionally, these raw files can be stored under a “raw” folder to make life even easier.

3. Apply caching policies on a model level
Don’t forget to apply a caching policy. You might then ask:
What is a caching policy?
Normally, whenever you query something from Looker, the query is run against your data warehouse and the result is brought back to Looker. In order for you to save costs and be more efficient, Looker caches your result for 1 hour by default. This feature can be manipulated and set to something like 24 hours — optimising performance with the benefit of saving you money.
Why is it important?
Because the whole idea is to minimise the wait time between querying and getting results. Business intelligence is like customer service: you want to be answered fast! This Looker feature is an easy way to reduce the time to insights.
What is a datagroup?
Datagroups are a named caching policy to which you can refer in your lookml, allowing you to write DRY (Don’t Repeat Yourself) code. This is telling Looker to keep these results for X amount of hours unless it detects new data in your warehouse via an SQL script (for every 5 mins), in which case it will refresh your data. See an example of a datagroup on the next point.
How do datagroups work?
After defining your datagroups, apply them at the model level as shown in the picture below on line 9. All explores under this model will then inherit the same datagroup. This will help reduce the load on your data warehouse and prevent the query from going back and forth. The faster your query, the happier your business user and the more analysis you can perform.
Example of applying caching policy at the model level using persist_with parameter:
############## Connection Definition #####################
connection: "snowlooker"
# Pointing to Explore and Datagroups ################
include: "/explores/*.explore"
include: "/datagroups.lkml"
######## Applying Caching policy ####################
persist_with: the24hourupdate
######## New name_value_format ######################
named_value_format: millions {
value_format: "[>=1000000]0.00,,\"M\";[>=1000]0.00,\"K\";0.00"
}
4. Persist derived tables if any
If you have derived tables in your Looker instance which are pulling data and building a huge table, consider persisting that derived table.
What does that mean for Looker users who have never heard of this?
If you have managed to create a derived table, chances are you have not yet persisted it and your wait time for the result is lengthy.
Normally, if you have a derived table joined in an explore, and you query something from that explore, the query is sent to your database or data warehouse, and the table is built first. Then your query is run on the new table and the answers are pulled into Looker. If you do not persist your derived table, every time you run a query, you’ll have to wait until the table is created to get your result. This not only comes at a cost, but it’s also time-consuming.
If you persist your derived table, on the other hand, you’d experience a significant increase in performance. This is because Looker materialises the derived tables in a scratch schema for as long as you specify (using datagroups) so new tables do not have to be built over and over again. This saves money and time, enabling your team to focus on key analysis.
How do you create and apply a caching policy?
Step 1: First, create a .lkml file to house all your datagroups in one place. You could have simply written the same line of code on your model, but this is useful if you have more than one model, to have all your datagroups defined in one place and use them across all of your model files. If you need to make a change in your datagroup, you need to head to this .lkml file only. As always, the goal is to optimise the workflows. We want to be efficient!
datagroup: the24hourupdate {
sql_trigger: SELECT CURDATE();;
max_cache_age: “24 hour”
}
Step 2: Include your datagroup.lkml in your model file as follows:
include: “/datagroup.lkml”
Step 3: Apply your datagroup to your derived tables using datagroup_trigger parameter
view: dt_customer_facts {
derived_table: {sql: select b.user_id as user_id,
MIN(b.created_at) as First_order,
MAX(b.created_at) as Latest_order,
count(distinct b.order_id) as Total_orders,
sum(b.sale_price) as Total_revenue
from order_items b
group by 1
;;datagroup_trigger: the24hourupdate
}
5. Make use of group_label and hidden parameter for clean explores
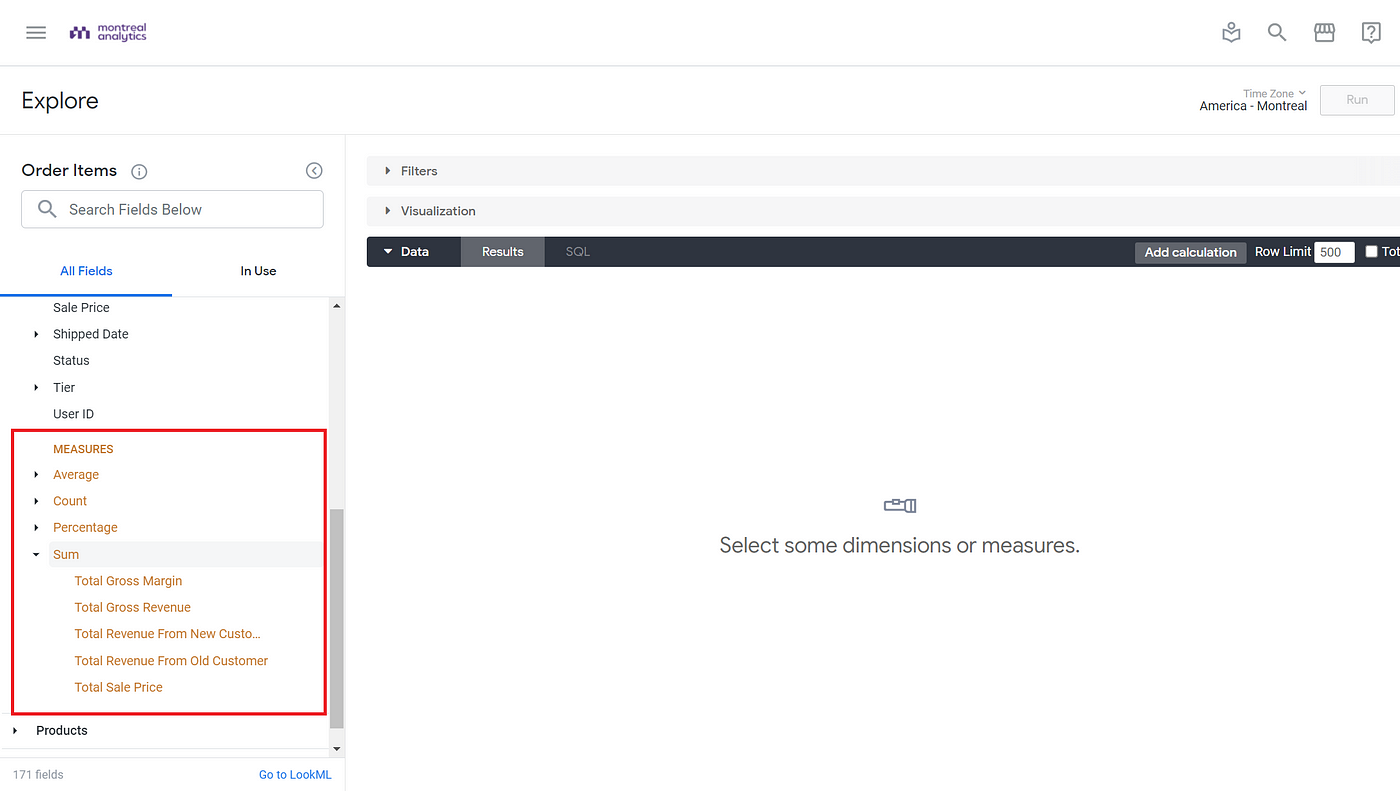
The main objective of Looker is to provide a user-friendly interface for business users that is both simple to use and easy to understand. To achieve such a design, we recommend you limit the number of views and dimensions within your explore. Keep useful information and hide unimportant dimensions such as technical housekeeping fields like updated timestamps, redundant fields, or fields that make no sense, using the hidden parameter. Group your measures or dimensions using group_label to avoid information clutter. For instance, group all type:sum as Sum or type:average as Average. See below:
- How to apply
hiddenparameter:
dimension: user_id {
type: number
sql: ${TABLE}.”USER_ID” ;;
primary_key: yes
hidden: yes
}
- How to apply
group_labelparameter:
measure: total_gross_revenue {
group_label: “Sum”
description: “Total revenue from completed sales (cancelled and returned orders excluded)”
type: sum
sql: ${sale_price};;
filters: [status: “Complete,Processing,Shipped”]
value_format_name: millions
drill_fields: [detail*]
}
- Here is how it looks in the Explore:

Bonus Tips
- Create a “readme.md” file detailing the data used, the objective, which team would benefit from the analysis, and the developer in charge of that project. The assigned developer should then monitor, maintain, and audit the project on a quarterly (optional) cadence to ensure best practices are applied.
- Enable PRs to review code before changes are pushed to production in order to reduce the chances of error.
- Set up a markdown (.md) file on every project homepage to instruct developers and data analysts on a list of rules that need to be followed. Having this protocol in place will guarantee consistency in writing code. Likewise, it will make it easier to welcome and train new employees.
With these changes, it becomes significantly easier to scale your Looker instance, for easy use across the business. Looker is a great tool for analysis and visualisation, and ensuring that your instance remains organised will allow you to efficiently create business value with your data.
Do you want to create powerful dashboards for your business users or take your BI capability to the next level? Have a look at how we created a sophisticated alerting system for leading online retailer, MandM Direct, or contact us.


