Computer Vision: Object Detection and No-Code AI with AutoML

Author: Ruairidh Russell, Machine Learning Engineer
In the first and second parts of this Computer Vision blog series, we spoke with some of Datatonic’s experts to hear their experiences of Computer Vision, and where it is heading in the next few years. This blog will provide a step-by-step walkthrough of how to develop your own Computer Vision model, train it on Google Cloud, and deploy it without writing a single line of code courtesy of Vertex AI’s AutoML service.
Introducing AutoML on Vertex AI
One of the key trends in Machine Learning in 2022 is no-code AI: an efficient method to get started on AI projects with minimal effort or domain knowledge. The Vertex AI AutoML service is an example of this trend and allows developers, software engineers, or just curious minds to train efficient, high-quality Machine Learning models effortlessly.
AutoML caters to a wide range of applications, which includes extracting insights from tabular, language, and image data. The service is well suited to rapid experimentation during the early stages of a project, developing proof of concepts, and even building high-performance models to serve both online and offline (Edge).
Object Detection
In Object Detection, our goal is to locate instances of desired objects within images. For those of you with more of a Machine Learning background, the task can be thought of as both classification and regression; the network uses a classification head for predicting the class type and the regression head of the network is used for optimising the bounding box location. To put it simply, we are training a model to draw boxes around desired objects in an image.

Object Detection has many applications that can help automate processes in various industries. Examples include locating faults within parts on a production line or monitoring the types of traffic on certain roads. In this walkthrough, we build a Datatonic Logo Detector, where the objective is to locate and draw boxes around every instance of the Datatonic logo within an image.
Creating a Vertex AI Managed Dataset
Within Google Cloud head over to Vertex AI (found within the navigation menu on the left-hand side of the User Interface), and navigate to the “Datasets” section to begin your project. Select “CREATE” and follow the steps to set up your dataset of choice; in this case, “Image object detection”.

Next, we will need to import our image data. From within your dataset, navigate to the “IMPORT” tab and choose the “Upload images from your computer” option, and select your data for upload. In this example, we are going to define our Training, Validation, and Test sets via the User Interface (UI), so leave “Data split” as “Default” when importing. The images will be uploaded to Google Cloud Storage so you must also specify a Cloud Storage bucket for them to be stored.

Data Labelling
Once your dataset has been uploaded, it is time to start the data labelling process. This is where we tell the Object Detection algorithm what to learn by drawing boxes around the desired objects and classifying them. Each group of objects we would like to detect, such as cats or dogs, are called classes. In this case, bounding boxes are drawn around only a single class: the Datatonic logo. However, it is possible to label and classify multiple classes.
Navigate to the “BROWSE” tab and under “Images” select “ADD NEW LABEL” and add a label for each class you would like to train on. Ideally, we should have an equal number of examples of each class within the dataset to give AutoML the best chance to perform well across your data; this is called balancing the classes.

To label your data, select an image in your Vertex AI Dataset and then click on “Add bounding box” in the toolbar above your image. Simply click to draw your bounding boxes around the desired objects – all occurrences if there is more than one in an image. Draw these bounding boxes as tightly as possible around the perimeter of the objects; this reduces unnecessary noise and helps the algorithm to learn your objects better.
After drawing each bounding box, you will be prompted to confirm which class the objects belong to. Follow this procedure until all of your data is fully labelled. The labelling service provided by Vertex AI’s managed datasets is another key advantage to using Google Cloud as this avoids the difficulties associated with using external labelling software.
If you have a lot of images to label, you can also take advantage of another Vertex AI service and let others label the images for you. Simply navigate to “CREATE LABELING TASK” to specify your labelling instructions, but bear in mind this will incur additional charges.
Object Detection Model Training
Typically, one of the most time-consuming aspects of a Machine Learning project is model development, where it can take many weeks to experiment with different modelling approaches and custom algorithms to find the optimal solution.
With Vertex AI’s AutoML, users do not need to spend time on model selection, experimentation, or hyperparameter tuning; this is all taken care of, allowing for more time to be spent on other areas, such as data collection or building the infrastructure around productionising your solution.
Users are also not limited by the constraints of their local machines, which often affect the algorithms chosen and training time; Vertex AI will handle the compute resources used for training your complex models.
To commence training, select “Train new model” from the panel on the right-hand side of the UI, and within “Training method” select “AutoML”.

For AutoML to train on your data, it needs three dataset splits: training data (used during training), validation data (used to monitor training), and test data (used for testing after the model has trained).
In terms of splitting your data into these sets, there are several options:
- Allow Vertex AI to do this randomly for you, where you only need to determine the split percentages (the default is 80% Train, 10% Validation, and 10% Test).
- Manually select images for each set via the UI (use the “ASSIGN ML USE” option).
- Specify within the image import JSONL file.
Using the default splits that AutoML generates for you is the easiest and quickest method and reduces the complexity of your project. If you choose to manually select which images are present in your training, validation, and test sets, then it is advised to keep the splits similar to the defaults, and ensure that each set has equal proportions of each class.
By selecting the “Randomly assigned” option within “Model details”, the splits are taken care of for you so you can jump straight into training (Fig 5).
Despite taking care of model training and selection for you, Vertex AI’s AutoML allows for the specification of certain model characteristics to suit your use case. In addition to allowing for online and offline model serving, you can specify whether to optimise for accuracy or low latency under “Training options”. This gives control to the user to mould the AutoML model to the project requirements or business needs.

For “Compute and pricing”, it is important to be aware of the costs associated with using Vertex AI’s AutoML service. A useful tip for when you submit your training job is to ensure “Enable early stopping” is selected (Fig 7). This means that when the model has converged (essentially meaning it will not learn anymore from the data provided) training will stop, and you will only be charged for node hours used instead of the full budget allocated.
When ready, select “START TRAINING” and you can now relax without the need to monitor live model metrics, as this is also taken care of for you.

Model Evaluation
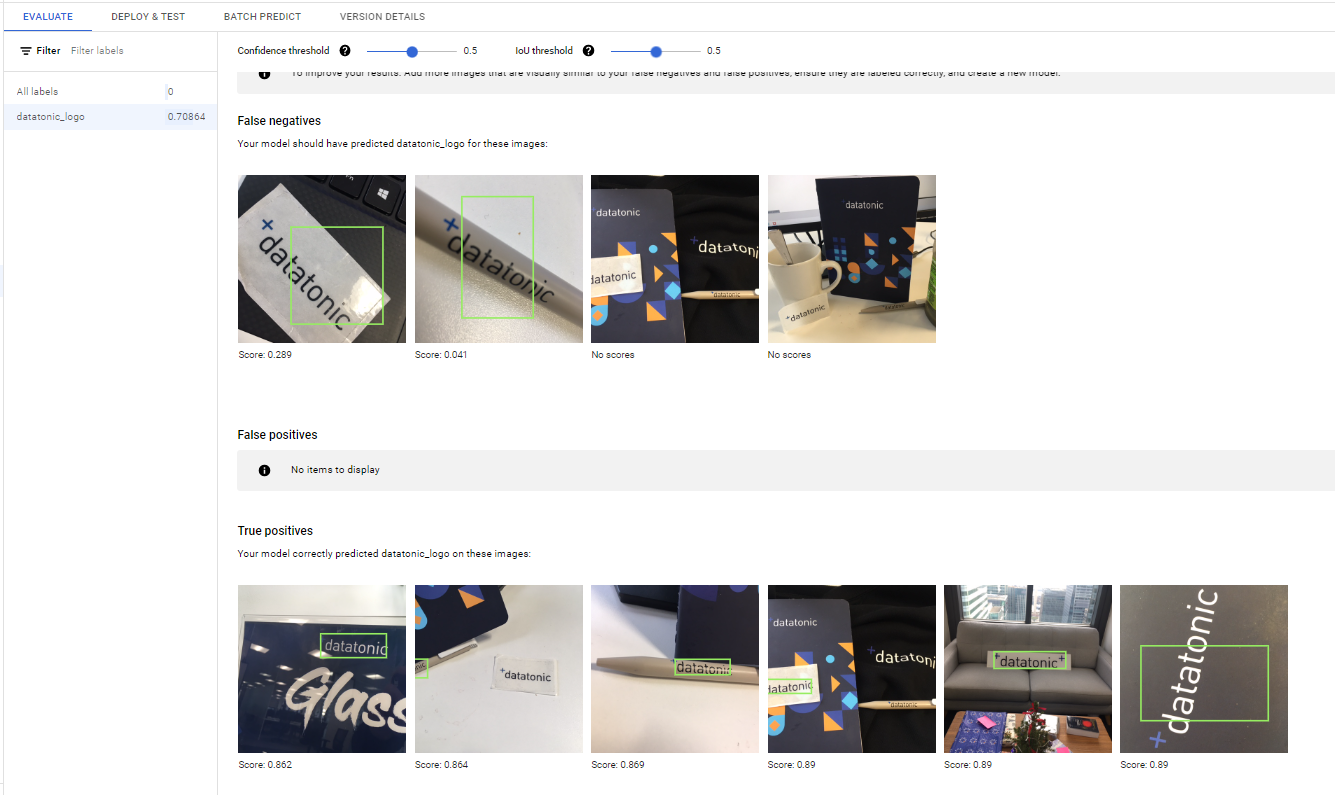
Once training is complete (the status of this can be found under Vertex AI “Training”), you can then navigate to the “Models” page to analyse its performance by simply selecting your model and version. The “EVALUATE” tab allows you to see key metrics relating to your model’s performance such as precision, recall, and average precision as well as providing you with various graphs which allow you to gain a deeper understanding of your model.

To observe a more detailed, object-by-object analysis, select a class beneath the “All labels” section. The UI shows how your model is performing on your test images by displaying your True Positives, False Positives, and False Negatives. This means you can see which images your model performs well on, and where it could improve, allowing for data-driven decisions to be made for improving performance.
For example, is there a particular type of class or image angle that is not performing so well? If so, you can tailor your dataset to include more images of these occurrences. Even without Machine Learning expertise, it is straightforward to understand how your model is behaving via this evaluation service.
There are also some slightly more technical aspects of the service; you can alter the confidence and IOU thresholds that are used when calculating whether an instance is a True Positive, False Positive, or False Negative, and thus visualise how these thresholds are affecting your results. You can also alter the desired confidence threshold when serving your model based on whether you wish to prioritise precision or recall.
Model Deployment
Once you are happy with your model, it is time to deploy and see it in action! Navigate to the “DEPLOY & TEST” tab and follow the instructions to create your endpoint. This will deploy your model to Google Cloud.
With AutoML Edge, you are also able to export your model as a TensorFlow Lite model, a TensorFlow SavedModel to run in a docker container, or as a TensorFlow.js package for running in a browser. This flexibility in deployment methods is another reason why this service is so beneficial to so many users.
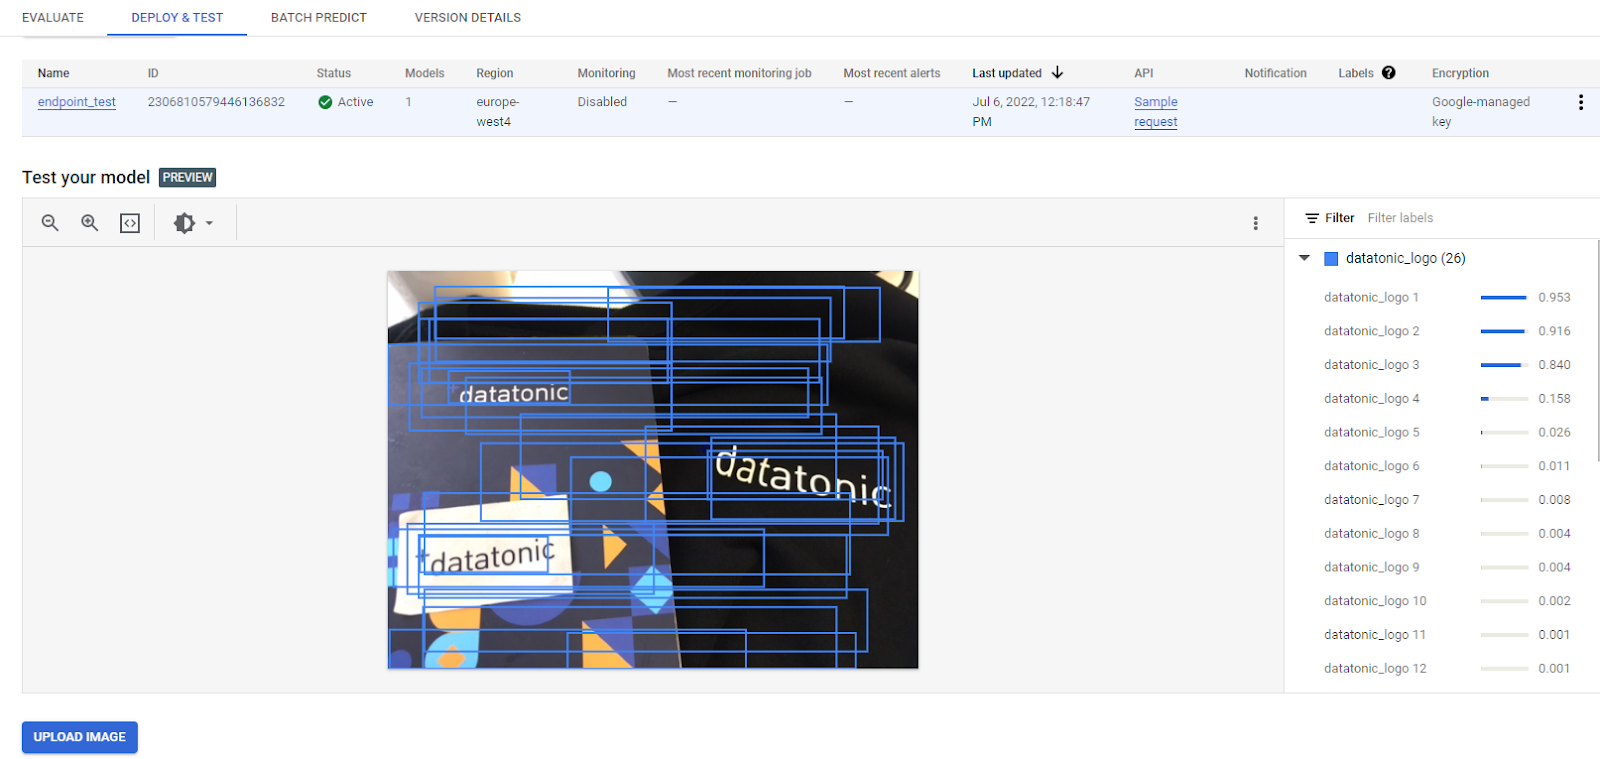
Once you have deployed your model to an endpoint, you can test it by uploading images to the UI to see it in action! As we can see in Fig 10, the model has predicted many bounding boxes for the image. On the right-hand side, we can see the confidence of the predictions, and ignore the low ones. If you hover your cursor over the predictions, then the bounding box they relate to is highlighted. In this case, it successfully classified the three logos! Remember to undeploy your model from the endpoint when you are finished.
Diving Deeper into Object Detection and AutoML
So far, we have discussed the no-code, no-ML-expertise-needed approach to AutoML. However, for those of you who are curious to dive deeper into the service to integrate your model into your application then I encourage you to take advantage of Vertex AI’s API. You can use this to train your model, deploy it to an endpoint, call online predictions, make batch predictions on a set of data, and to further evaluate your model’s performance with metrics such as the F1 score.
Summary
With Vertex AI’s AutoML service, Machine Learning has become much more accessible and democratised for users with little prior expertise in the area. The quality of no-code Machine Learning solutions is only going to get better over the next few years and the high performant and easy-to-productionise nature of Vertex AI’s AutoML means that the service can allow for the fast integration of AI into businesses to rapidly generate real value.
As 4x Google Cloud Partner of the Year, Datatonic has a wealth of experience in Computer Vision, Machine Learning, and a range of Google products and services. Contact us here to discuss how using Object Detection or other Machine Learning models could help your business!
Check out our other Computer Vision blogs in this series:
Part 1: Computer Vision: Insights from Datatonic’s Experts
Part 2: Computer Vision: Emerging Trends and Google Cloud Technology
Part 3: Computer Vision: Object Detection and No-Code AI with AutoML
Part 4: Computer Vision: Deploying Image Segmentation Models on Vertex AI
Part 5: Computer Vision: Generative Models and Conditional Image Synthesis