Managing Looker Access Rights for Your Organisation

As Looker’s go-to partner in EMEA, Datatonic’s in-house Looker team has have worked with market leaders such as MandM Direct on key projects to enable them on their journey towards becoming a more data-driven organization and action insights proactively.
One of the key drivers of being a data-driven organisation is enabling employees to access the right data at the right time – but this should not come at the cost of legal or internal rules ensuring safe data is distribution and use.
In this blog, we answer a question we have been asked by many of our clients: How do we limit the data available to Looker users?
There are a range of different scenarios that require certain pieces of data to be restricted from view, for example:
1. “We are launching a new website this year and have to put through multiple test orders to ensure the data flows through the systems correctly. We need to be able to see these orders in Looker, however, they should not interfere with the key metrics; revenue, margin etc.“
2. “I want my sales team to be able to see their progress vs. their own sales targets, but not other members of the team’s targets.“
3. “I want all users to be able to access a dataset that shows the revenue for every product at my company. However, there is a column within this dataset that shows the product margin, which I only want senior managers to be able to see.“
One of the core values of Looker is that developers should not have to repeat code when creating their LookML model. Although one answer to all of the above questions would be to create different LookML files to answer each individual scenario, it would require them to repeat code. All of the above scenarios, and more, can be solved by using the process flow detailed below.
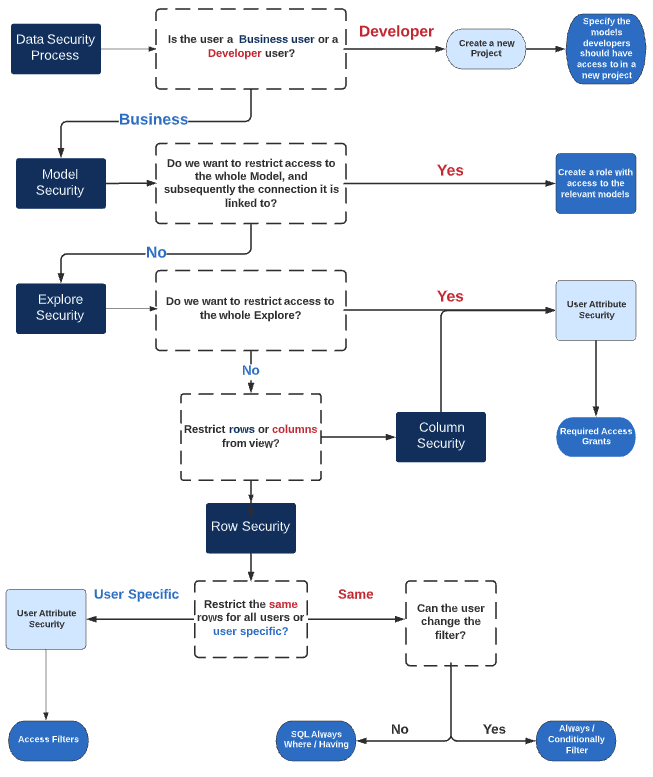
The two main types of users that Looker have are business users and developer users; developers build the solution that the business users access in the front-end of Looker. Developers ensuring that business users only see the data they need, so giving them the same access as business users would make life very difficult!
Each of these user types requires different processes for ensuring there is legitimate data access. A range of tools can be used to limit the access to business users, however as soon as one of these users is given developer permissions, they can bypass some of these controls due to having access to developer tools such as SQL runner.
To summarise, if you need to limit the access that developers have to data, you will need to create a new project and put that data into a separate connection.

This new project will be restricted to a certain number of models and as a result, a certain number of database connections, limiting the data a user can see – even in SQL runner.
As the model files determine access to a connection and subsequently the data held within that connection, a user cannot access any data outside of these connections. This is why some of the tools that we discuss in this blog will not work for developers; as by having access to a project a user can use SQL runner to access every connection that is placed in the project, even if they do not have access to all the models. Therefore, the way to stop developers viewing data is to create an entirely new project and define the connections there.
However, if you are happy with the data restrictions in place for your developers, and would like to create a governance strategy for your business users, you have other options.
Looker has a range of functionalities that can be utilised to meet the needs of all of the above cases. This blog will cover:
- User Attributes
- Required Access Grants
- Access Filters
- Model permissions
- SQL Always Where / Having
- Always Filter
Restricting access to models
Access to models of data is restricted through “Roles and Permissions”. A role is made up of two items; a permission set and a model set. The model set defines the models that a user has access to, and the permission set defines what the user can do with that model.
If you have a group of users who should only have access to Model A, but not Model B, you can create a model set that only has access to Model A combined with a permission set to create a role. Users will then not be able to see Model B, as it has not been selected in the role. If a user has been added to a separate group that does have access to Model B, they will then be able to see the sum of the models defined in both roles.
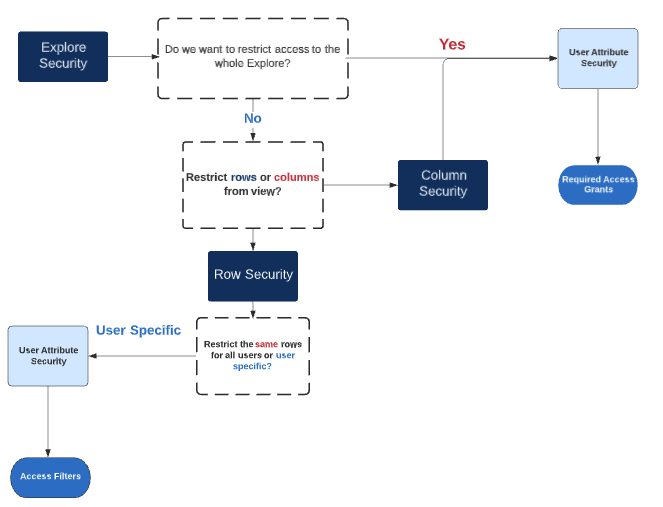
Restricting access to explores
Once you have given a business user access to a model, you then may want to limit the Explores within that model they are able to access. Explores are where business users access your data, and so an important place to think to restrict access. To begin with, a company may want one Explore that contains sensitive financial information to be accessible only to the finance team, and not to any other users. In that case, we would use the feature called ‘Required Access Grants” and combine it with “User Attributes” to limit the access.
Here, the steps to create the user attributes are as follows:
1. Head to Admin – Users – User Attributes
2. Click Create User Attribute
3. Give your User Attribute a name and ensure that you select either “View” or “None” for User Access, or else the user attribute will not be able to be used to restrict access.
4. Go into the records of the users/groups that you want to match these security requirements to, and assign them a value that will match the security requirements.
![]()
5. In the Explore, this User Attribute needs to be called to ensure that only users who have the appropriate value in this field can see the data.
There are two steps to this process:
- Create an “Access Grant” at the model level
- Call this access grant in the Explore, so that only users with the matching value in their user attribute can access the Explore

Only users who have a value in the User Attribute that matches the “allowed values” field in step 1 will be able to access the Explore. The Explore will not appear in the drop-down list of Explores, and if the user has a URL from when they could previously access the Explore, this will return a 404 error page.
Restricting access to rows and columns
It is possible that you do not want to restrict access to the whole Explore, just sections of it. The following are two common scenarios for wanting to restrict access to segments of an Explore:
- Your company has a Sales Explore that details gross revenue, margin and cost per individual sale. You want some users to be able to access all of these fields; but some users to only be able to see the revenue field as you do not want them to be able to see the margin of each sale.
- There is an Explore which details sales reps targets and the progress they are making to these targets at a monthly, quarterly and yearly level. You do not want to have to create an Explore for each sales rep, however, you want them to only be able to view the rows of data that show their own progress.
Restricting access to columns
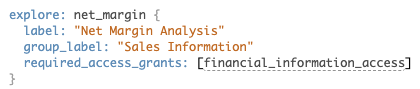
Access to columns can be restricted in the View file that the Explore is exposing. As with our net margin example earlier, we can link a column to a user attribute to ensure that only users with the relevant value in the user attribute can view the column in their Explore.
In the case of restricting columns from view, we can again take advantage of user attributes and combine these with the “Required Access Grants” to remove this column from view.
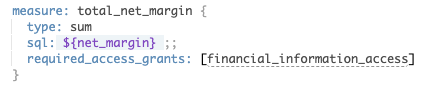
Here, we have taken the finance access grant we created earlier and called this in our dimension definition. This will then exclude the column from the Explore view for any user who does not have the required value in their User Attribute.
Restricting access to rows
If it is rows that we want to remove from view, then there are a couple of options available. In some scenarios, for example, if a company is placing test orders on a website, you would probably want these rows of data excluded from the view of everyone as including these rows of data would give an inaccurate representation of company performance. You could then simply set up a separate Explore that would only show details of test orders and track them here.
Another example is where you want sales reps to only be able to see the progress their territory is making to their own target. A scalable solution would not be to create an Explore for every territory; a better solution would be to utilise user attributes again, but this time use them as a filter on the data so that the rows returned match the user attribute.
As a reminder, our process flow so far looks as follows:
Looker Access Rights
Hide user-specific rows of data
As the diagram shows, to restrict specific rows of data from view we will be using a combination of user attributes and a functionality called access filters.
Our example dataset below shows Product Revenue by country. There are no filters currently applied, and so all the countries this business operates in are showing: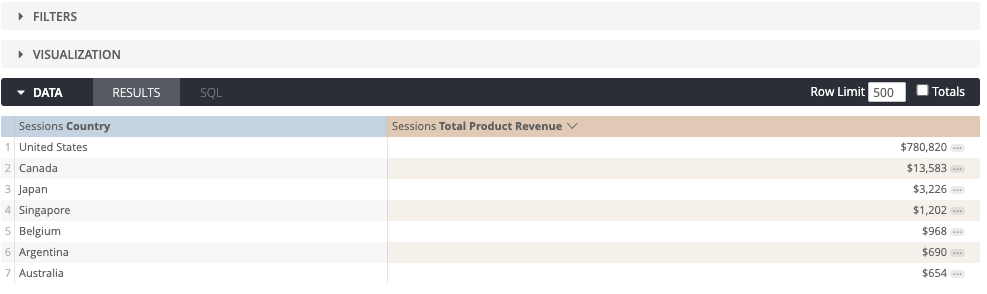
In this scenario, there is one sales rep for each country, and we want the sales reps to only see their countries data. We can achieve this by defining a user attribute that is linked to the country field, and this will therefore limit the data that the user can see to the value that is in their user settings.
![]()
Now that we have created this user attribute, we can link it to the Explore using a feature called access filters. Within an access filter there are 2 elements:
- The field of the Explore that should be filtered
- The user attribute that is used to filter the Explore
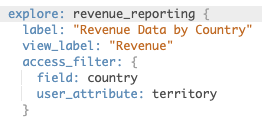
In this scenario, the value that is filled in for the user must match the value that is used in the dataset. In the below dataset, as I have filled “Canada” in the user attribute, if the user were to look at the Explore they would be able to see the below data only:
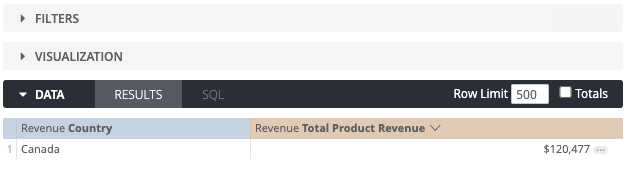
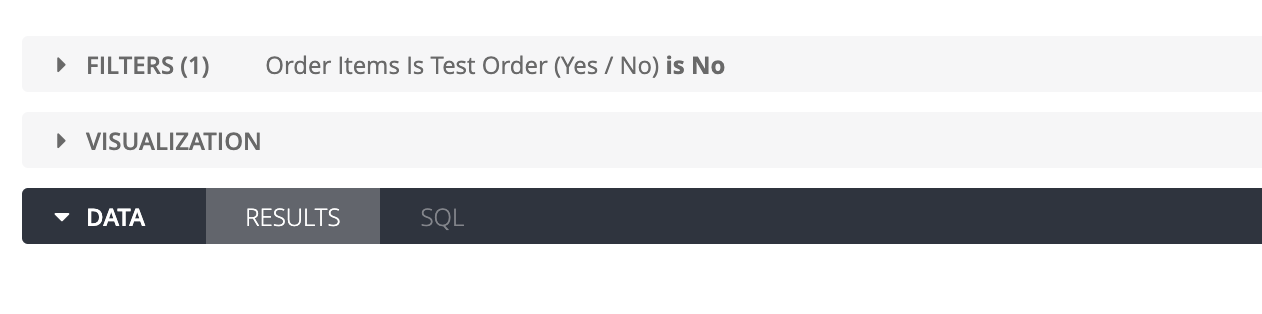
As you can see, there are no filters applied. The access filter has been added to a “Where” clause in the SQL statement, which is removed from the view of a business user.
Hide the same rows of data from all users
If we want to keep the data available the same for all users, there is functionality that allows this as well. We can set Explores to pre-load with data removed from view, and there is no need to use a filter in the Explore that the user may be able to change. To do this, we can use the SQL always where function, which will preload the explore with SQL functions already in place, ensuring the user cannot access the data.
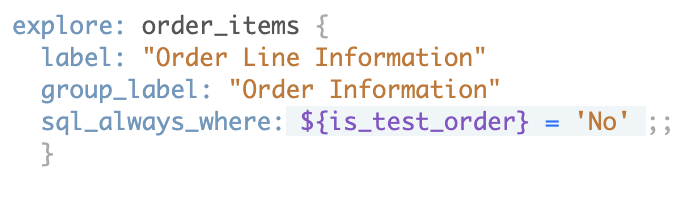
In this “SQL Aways Where” statement, we have asked the Explore to only present rows of data to users where the binary field for test orders is not equal to “No”. As mentioned earlier, users with SQL run permissions can access these test orders via SQL Runner, but for regular business users, these rows of data will be hidden from view.
If, however, you would like users to have the option to view these test orders in the same Explore, you could use the always filter option. This again is defined in the Explore definition as below, the difference being users have the option to change this in the front-end: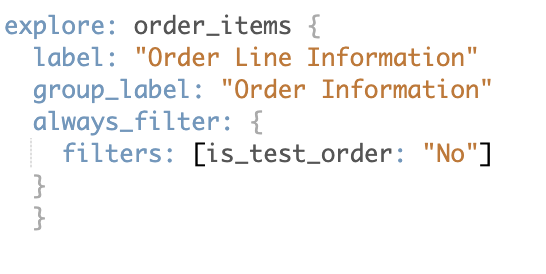
That brings us to the end of the process flow we showed at the start of this article.
Hopefully, we have covered every scenario your company might come across for limiting access to data. If there are any that we have not covered, please let us know – we’d love to hear from you!


